
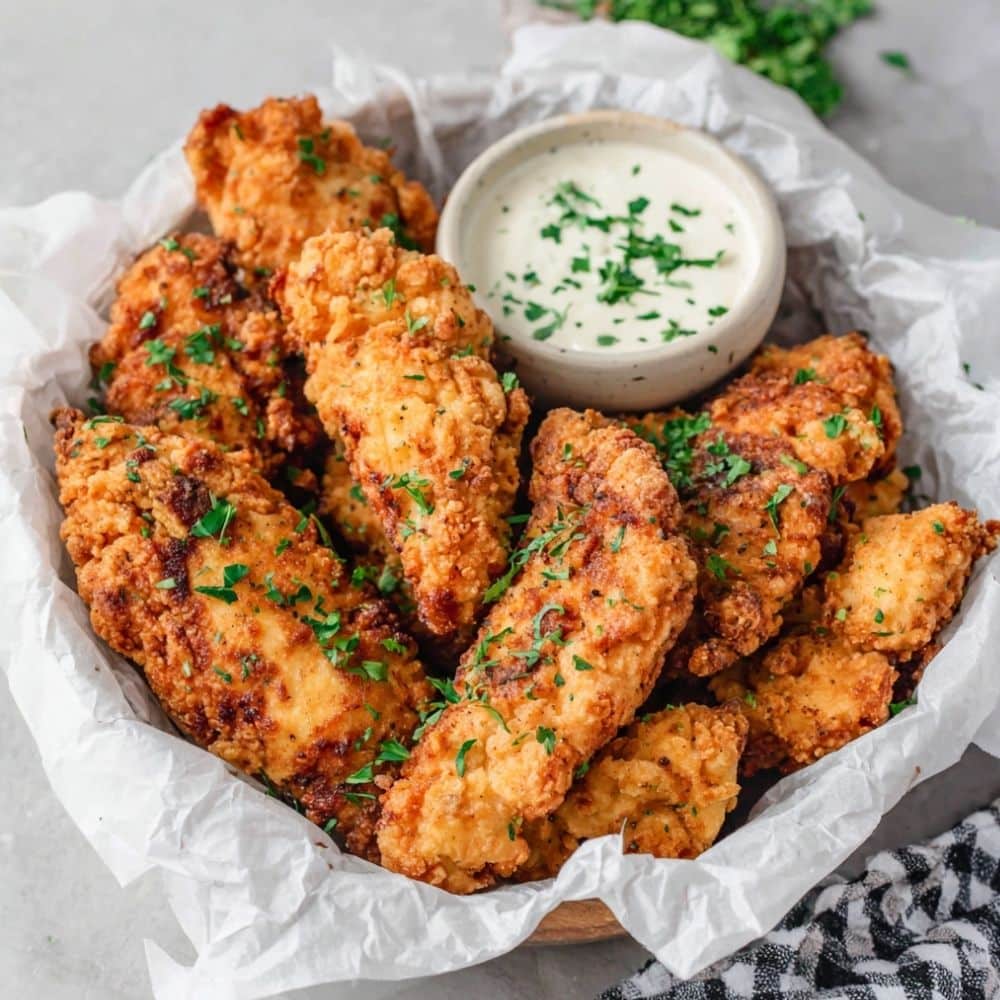
There’s something magical about the perfect buttermilk fried chicken tender – that satisfying crunch as your teeth break through the golden, crispy coating to reveal juicy, tender chicken within. These Buttermilk Fried Chicken Tenders aren’t just another recipe; they’re a celebration of Southern comfort food at its finest. The tangy buttermilk marinade works as a natural tenderizer, infusing each piece with incredible flavor while creating the foundation for an exceptionally crispy exterior.
Whether you’re planning a family dinner, game day gathering, or simply craving the ultimate comfort food, these homemade buttermilk chicken tenders deliver restaurant-quality results right from your kitchen. The secret lies in the double-dredging technique and carefully seasoned flour mixture that creates layers of crunch you simply can’t get from store-bought alternatives. Get ready to master the art of crispy chicken tenders that will have everyone asking for seconds.
Recipe Information
- Difficulty: Medium
- Preparation Time: 20 minutes (plus 2-4 hours marinating)
- Cooking Time: 15 minutes
- Resting Time: 2-4 hours (marinating)
- Servings: 4-6 people (about 12-15 tenders)
- Estimated Cost: Affordable
Ingredients for Buttermilk Fried Chicken Tenders
For the Chicken and Marinade:
- 2 pounds (900g) chicken tenderloins or chicken breast cut into strips
- 2 cups (480ml) buttermilk
- 2 teaspoons salt
- 1 teaspoon black pepper
- 1 teaspoon garlic powder
- 1 teaspoon onion powder
- 1/2 teaspoon smoked paprika
- 1/4 teaspoon cayenne pepper (optional, for heat)
For the Seasoned Flour Coating:
- 2 cups (250g) all-purpose flour
- 1 tablespoon cornstarch
- 2 teaspoons salt
- 1 teaspoon black pepper
- 1 teaspoon garlic powder
- 1 teaspoon onion powder
- 1 teaspoon smoked paprika
- 1/2 teaspoon dried thyme
- 1/2 teaspoon dried oregano
- 1/4 teaspoon cayenne pepper
For Frying:
- 4-6 cups vegetable oil or peanut oil (enough for 2-3 inches depth)
Equipment and Utensils Required
- Large mixing bowl for marinating
- Heavy-bottomed pot or deep fryer
- Wire cooling rack
- Baking sheet
- Meat thermometer
- Candy/oil thermometer
- Tongs or slotted spoon
- Paper towels
- Large shallow dish for flour mixture
Recipe Preparation: Step-by-Step Instructions
Step 1: Prepare the Buttermilk Marinade
In a large mixing bowl, combine buttermilk with salt, black pepper, garlic powder, onion powder, smoked paprika, and cayenne pepper. Whisk thoroughly until all seasonings are well incorporated. The buttermilk should be smooth and evenly seasoned.
Step 2: Marinate the Chicken
Add chicken tenderloins to the seasoned buttermilk mixture, ensuring each piece is completely submerged. Cover the bowl with plastic wrap and refrigerate for at least 2 hours, or preferably 4 hours for maximum flavor and tenderness. The acids in the buttermilk will break down the proteins, resulting in incredibly tender chicken.
Step 3: Prepare the Seasoned Flour
In a large shallow dish, combine all-purpose flour, cornstarch, salt, pepper, garlic powder, onion powder, smoked paprika, thyme, oregano, and cayenne pepper. Mix thoroughly with a whisk to ensure even distribution of all seasonings. The cornstarch is crucial for achieving that extra crispy texture.
Step 4: Set Up Your Frying Station
Heat oil in a heavy-bottomed pot to 350°F (175°C). Use enough oil to maintain 2-3 inches depth. Monitor the temperature closely with a candy thermometer – consistent temperature is key to perfectly fried chicken tenders. Set up a wire cooling rack over a baking sheet nearby for draining.
Step 5: First Dredging
Remove chicken pieces from buttermilk marinade, allowing excess to drip off but don’t completely dry them. Dredge each tender in the seasoned flour mixture, pressing gently to ensure the coating adheres well. Shake off excess flour.
Step 6: Second Dip and Final Coating
Dip the floured chicken back into the remaining buttermilk marinade briefly, then immediately dredge again in the seasoned flour. This double-dredging technique creates multiple layers that result in extra crispy chicken tenders with incredible texture.
Step 7: Fry to Golden Perfection
Carefully lower 3-4 chicken tenders into the hot oil, being careful not to overcrowd the pot. Fry for 3-4 minutes per side, or until the internal temperature reaches 165°F (74°C) and the coating is golden brown and crispy. The chicken should float when done.
Step 8: Drain and Rest
Using tongs or a slotted spoon, transfer the crispy chicken tenders to the wire cooling rack. Let them rest for 2-3 minutes before serving to allow the juices to redistribute and the coating to set.

Chef’s Tips and Variations
Pro Tips for Extra Crispy Results:
- Temperature control is crucial: Maintain oil temperature between 325-350°F. Too hot and the coating burns before the chicken cooks through; too cool and you’ll get greasy, soggy results.
- Don’t skip the resting time: Let the coated chicken sit for 5 minutes before frying to help the coating set.
- Batch cooking: Fry in small batches to maintain oil temperature and ensure even cooking.
Flavor Variations:
- Nashville Hot Style: Add 2 tablespoons hot sauce to the buttermilk marinade and increase cayenne in the flour mixture.
- Herb-Crusted: Double the dried herbs and add fresh rosemary or sage to the flour mixture.
- Spicy Cajun: Replace smoked paprika with regular paprika and add 1 teaspoon each of cumin and chili powder.
For Those Without Buttermilk:
While this fried chicken recipe is specifically designed for buttermilk’s unique properties, you can create fried chicken tenders no buttermilk by substituting with regular milk mixed with 1 tablespoon of vinegar or lemon juice per cup. Let it sit for 5 minutes before using, though the results won’t be quite as tender.
Perfect Pairings:
These buttermilk chicken tenders pair beautifully with:
- Crispy chicken tenders and fries – the classic combination
- Honey mustard or ranch dipping sauce
- Coleslaw and pickles for a traditional Southern plate
- Mac and cheese for the ultimate comfort meal
- Fresh biscuits and gravy for a hearty dinner
Storage and Reheating:
Store leftover chicken tenders in the refrigerator for up to 3 days. To reheat and restore crispiness, place on a wire rack over a baking sheet and heat in a 400°F oven for 8-10 minutes. Avoid microwaving as it will make the coating soggy.
Nutritional Information
Per serving (3-4 tenders):
- Calories: 385
- Protein: 32g
- Carbohydrates: 28g
- Fat: 18g
- Fiber: 1g
- Sodium: 890mg
Nutritional values are approximate and may vary based on specific ingredients used and portion sizes.
Mastering the Art of Homemade Buttermilk Chicken Tenders
Creating the perfect buttermilk fried chicken tenders is both an art and a science. The key lies in understanding how each ingredient contributes to the final result. Buttermilk’s natural acidity breaks down tough protein fibers while its thickness helps the seasoned flour coating adhere better than regular milk ever could.
The double-dredging technique used in this recipe creates what professional chefs call “shaggy coating” – those irregular, craggy surfaces that provide maximum crunch. When the coated chicken hits the hot oil, the moisture in the buttermilk creates steam, which pushes outward and creates air pockets in the coating. These air pockets, combined with the cornstarch in our flour mixture, deliver that signature satisfying crunch that makes crispy chicken tenders so irresistible.
Temperature control cannot be overstated in its importance. Professional kitchens use this same 350°F temperature because it’s the sweet spot where the coating sets and crisps quickly while the chicken cooks evenly throughout. This prevents the dreaded scenario of burnt coating with raw chicken inside, or perfectly cooked chicken with soggy, oil-logged coating.
The beauty of this homemade buttermilk chicken tenders recipe lies in its versatility. Once you master the basic technique, you can adapt the seasonings to match any flavor profile you desire. The foundation remains the same: quality chicken, proper marinating time, well-seasoned flour, correct oil temperature, and patience.
Frequently Asked Questions
Can I make crispy chicken tenders no buttermilk?
While buttermilk provides optimal results due to its acidity and thickness, you can substitute it with regular milk mixed with 1 tablespoon of white vinegar or lemon juice per cup. Allow this mixture to sit for 5 minutes before using. The chicken won’t be quite as tender, but you’ll still achieve good results.
How do I achieve extra crispy chicken tenders?
The secret to extra crispy chicken tenders lies in the double-dredging technique and temperature control. Make sure to dip the floured chicken back into the buttermilk, then coat again in seasoned flour. Also, adding cornstarch to your flour mixture creates additional crispiness, and maintaining oil temperature at exactly 350°F ensures the coating crisps perfectly.
Can I bake these instead of frying?
While these tenders are designed for frying, you can bake them at 425°F for 18-20 minutes, flipping halfway through. However, they won’t achieve the same level of crispiness as the fried chicken recipe method. For better baked results, spray the coated chicken with cooking spray before baking.
How long should I marinate the chicken in buttermilk?
For optimal tenderness and flavor, marinate the chicken for at least 2 hours, but 4 hours is ideal. You can marinate up to 24 hours, but beyond that, the buttermilk’s acidity may start to make the chicken mushy rather than tender.
What’s the best oil for frying chicken tenders?
Vegetable oil, peanut oil, or canola oil work best due to their high smoke points and neutral flavors. Avoid olive oil as it has a lower smoke point and can become bitter at frying temperatures. You need enough oil to maintain 2-3 inches depth for proper frying.
Conclusion
These Buttermilk Fried Chicken Tenders represent the pinnacle of comfort food – crispy, juicy, and packed with flavor in every bite. The combination of tangy buttermilk marinade and perfectly seasoned coating creates a texture and taste that rivals any restaurant. Whether you’re serving them as crispy chicken tenders and fries for a casual meal or as the centerpiece of a special dinner, this recipe delivers consistently excellent results.
The beauty of mastering this fried chicken recipe lies not just in the incredible taste, but in the confidence it builds in your kitchen skills. Once you understand the principles behind perfect fried chicken, you’ll find yourself experimenting with different seasonings and techniques, always coming back to this reliable foundation.
Have you tried this recipe? We’d love to hear about your experience! Leave a comment below sharing your results, any modifications you made, or questions you might have. Don’t forget to share photos of your homemade buttermilk chicken tenders on social media – tag us so we can celebrate your cooking success!
Looking for more delicious chicken recipes? Check out our other popular posts featuring different preparation methods and flavor combinations that will keep your dinner rotation exciting and delicious.
Comments Section: Share your cooking experiences, ask questions, and connect with fellow food enthusiasts below!
Print
Buttermilk Fried Chicken Tenders
- Prep Time: 20 minutes
- Cook Time: 15 minutes
- Total Time: 240 minutes
- Yield: 4-6 servings 1x
- Category: Main Course
- Method: Frying
- Cuisine: Southern
- Diet: None
Description
Perfectly crispy buttermilk fried chicken tenders, marinated for maximum tenderness and coated for ultimate crunch.
Ingredients
- 2 pounds (900g) chicken tenderloins or chicken breast cut into strips
- 2 cups (480ml) buttermilk
- 2 teaspoons salt
- 1 teaspoon black pepper
- 1 teaspoon garlic powder
- 1 teaspoon onion powder
- 1/2 teaspoon smoked paprika
- 1/4 teaspoon cayenne pepper (optional)
- 2 cups (250g) all-purpose flour
- 1 tablespoon cornstarch
- 2 teaspoons salt
- 1 teaspoon black pepper
- 1 teaspoon garlic powder
- 1 teaspoon onion powder
- 1 teaspoon smoked paprika
- 1/2 teaspoon dried thyme
- 1/2 teaspoon dried oregano
- 1/4 teaspoon cayenne pepper
- 4–6 cups vegetable oil or peanut oil (for frying)
Instructions
- In a large mixing bowl, combine buttermilk with salt, black pepper, garlic powder, onion powder, smoked paprika, and cayenne pepper. Whisk until smooth.
- Add chicken tenderloins to the buttermilk mixture, cover with plastic wrap, and marinate in the refrigerator for at least 2 hours (preferably 4).
- In a large shallow dish, mix together flour, cornstarch, salt, pepper, garlic powder, onion powder, smoked paprika, thyme, oregano, and cayenne pepper.
- Heat oil in a heavy-bottomed pot to 350°F (175°C), ensuring the oil is deep enough for frying.
- Remove chicken from buttermilk marinade and dredge in the flour mixture, pressing gently to coat.
- Dip the floured chicken back into buttermilk and coat again in the flour mixture.
- Fry the chicken tenders in hot oil for 3-4 minutes per side until golden brown and internal temperature reaches 165°F (74°C).
- Transfer the fried tenders to a wire cooling rack to drain the excess oil and let rest for a few minutes before serving.
Notes
Maintain oil temperature for perfect frying results. Let coated chicken sit for 5 minutes before frying for better adherence.
Nutrition
- Serving Size: 3-4 tenders
- Calories: 385
- Sugar: 1g
- Sodium: 890mg
- Fat: 18g
- Saturated Fat: 4g
- Unsaturated Fat: 10g
- Trans Fat: 0g
- Carbohydrates: 28g
- Fiber: 1g
- Protein: 32g
- Cholesterol: 75mg


How do I keep them warm while I am cooking the rest
Great question! 🐔 I usually keep the cooked tenders on a baking sheet in a 200°F (93°C) oven while finishing the rest. This keeps them warm and crispy without overcooking. 😊