
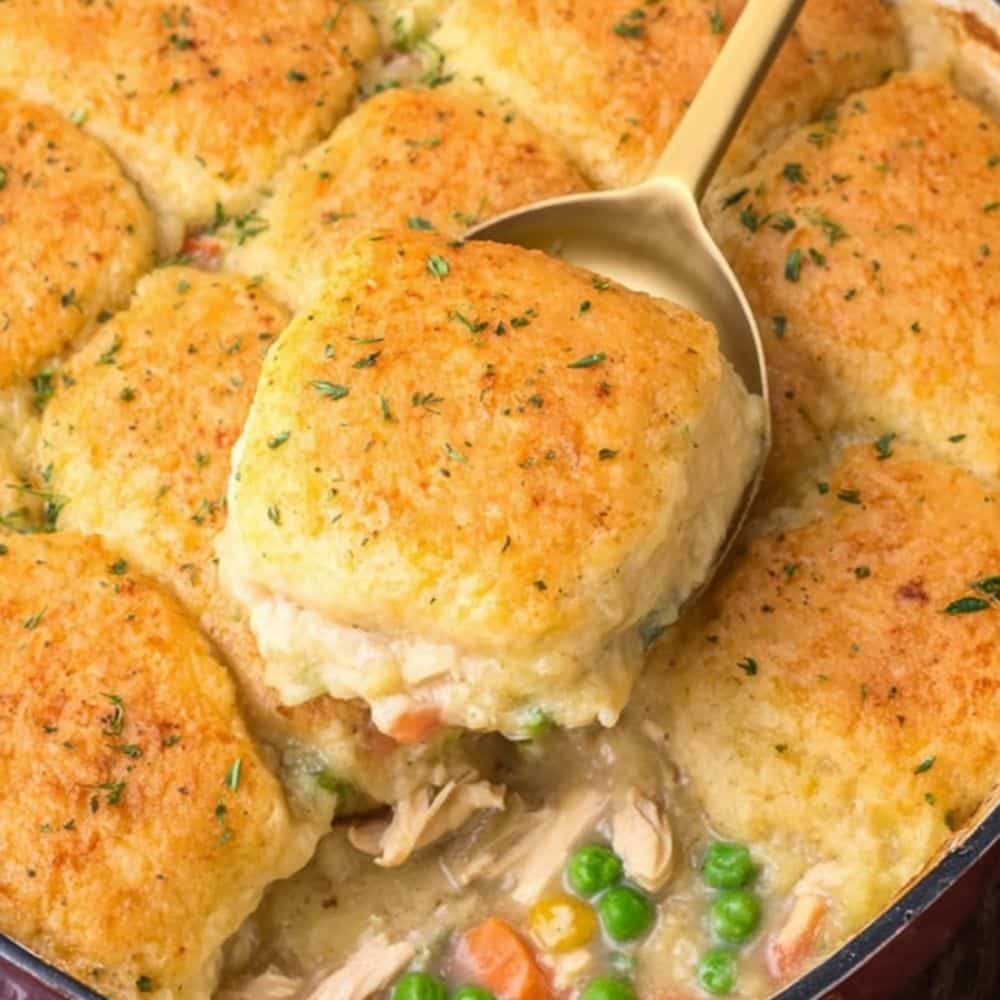
There’s something magical about comfort food that brings families together, and nothing does this better than a warm, bubbling Chicken Cobbler Casserole fresh from the oven. This Southern-inspired dish combines the heartiness of a traditional chicken pot pie with the rustic charm of a fruit cobbler, creating a unique casserole that’s become a beloved staple in American kitchens. Whether you’re looking for an easy weeknight dinner or a crowd-pleasing dish for Sunday supper, this recipe delivers every time.
What makes this Easy Chicken Cobbler Recipe truly special is its versatility and foolproof preparation method. Unlike complicated casseroles that require multiple steps and precise timing, this dish comes together in under an hour with simple ingredients you likely already have in your pantry. The tender chicken, vibrant vegetables, and fluffy biscuit topping create a perfect harmony of flavors and textures that will have your family asking for seconds and thirds.
Recipe Information
- Difficulty: Easy
- Preparation Time: 20 minutes
- Cooking Time: 35 minutes
- Total Time: 55 minutes
- Servings: 6-8 people
- Cost: Affordable
- Category: Main Dish, Casserole, Comfort Food
Ingredients for Chicken Cobbler Casserole
For the Chicken Filling:
- 2 pounds boneless, skinless chicken breasts or thighs, cut into 1-inch pieces
- 2 tablespoons olive oil
- 1 medium onion, diced (about 1 cup)
- 2 medium carrots, diced (about 1 cup)
- 2 celery stalks, diced (about 1 cup)
- 3 cloves garlic, minced
- 1/4 cup all-purpose flour
- 2 cups chicken broth
- 1 cup frozen peas
- 1 cup frozen corn kernels
- 1 teaspoon dried thyme
- 1 teaspoon dried sage
- 1/2 teaspoon salt
- 1/4 teaspoon black pepper
- 2 tablespoons fresh parsley, chopped
For the Cobbler Topping:
- 2 cups all-purpose flour
- 1 tablespoon baking powder
- 1 teaspoon salt
- 1 tablespoon sugar
- 6 tablespoons cold butter, cubed
- 3/4 cup whole milk
- 1/4 cup heavy cream
- 2 tablespoons fresh chives, chopped (optional)
Equipment and Utensils Required
- Large oven-safe skillet or Dutch oven (12-inch)
- Large mixing bowl
- Measuring cups and spoons
- Sharp knife and cutting board
- Wooden spoon or spatula
- Pastry cutter or fork
- 9×13 inch baking dish (if not using oven-safe skillet)
Recipe Preparation
Step 1: Prepare the Oven and Ingredients
Preheat your oven to 425°F (220°C). Cut the chicken into uniform 1-inch pieces for even cooking. Dice all vegetables to similar sizes to ensure they cook at the same rate. This preparation step is crucial for achieving the perfect texture in your Chicken Cobbler Recipe.
Step 2: Cook the Chicken
Heat olive oil in a large oven-safe skillet over medium-high heat. Season the chicken pieces with salt and pepper, then add them to the hot skillet. Cook for 5-6 minutes until the chicken is golden brown and cooked through. The chicken doesn’t need to be completely cooked at this stage as it will finish cooking in the oven.
Step 3: Sauté the Vegetables
Add the diced onion, carrots, and celery to the skillet with the chicken. Sauté for 5 minutes until the vegetables begin to soften. Add the minced garlic and cook for another minute until fragrant. This aromatic base is what gives the casserole its rich, comforting flavor.
Step 4: Create the Gravy Base
Sprinkle the flour over the chicken and vegetables, stirring constantly for 1-2 minutes to cook out the raw flour taste. Gradually add the chicken broth while stirring continuously to prevent lumps from forming. The mixture should thicken to a gravy-like consistency.
Step 5: Add Final Filling Ingredients
Stir in the frozen peas, corn, thyme, sage, salt, pepper, and fresh parsley. Let the mixture simmer for 2-3 minutes until slightly thickened. The filling should coat the back of a spoon but not be too thick, as it will continue to thicken in the oven.
Step 6: Prepare the Cobbler Topping
In a large bowl, whisk together flour, baking powder, salt, and sugar. Cut in the cold butter using a pastry cutter or fork until the mixture resembles coarse crumbs with some pea-sized butter pieces remaining. This technique ensures a flaky, tender topping.
Step 7: Form the Dough
Make a well in the center of the flour mixture and pour in the milk and cream. Gently stir with a fork until just combined. Don’t overmix – the dough should be slightly sticky and shaggy. Overmixing will result in tough biscuits.
Step 8: Top the Casserole
Using a large spoon or ice cream scoop, drop the dough in mounds over the hot chicken mixture. The dough doesn’t need to cover the entire surface – gaps are perfectly normal and will allow steam to escape during baking.
Step 9: Bake to Perfection
Place the skillet in the preheated oven and bake for 20-25 minutes until the topping is golden brown and the filling is bubbling around the edges. The internal temperature should reach 165°F (74°C) for food safety (USDA recommends cooking all poultry to 165°F using a food thermometer).
Step 10: Rest and Serve
Remove from oven and let cool for 5 minutes before serving. This allows the filling to set slightly and prevents burning your mouth on the hot filling. Garnish with fresh chives if desired.

Chef’s Tips and Variations
Professional Tips for Success
The key to an exceptional Best Chicken Cobbler Recipe lies in the details. Always use cold butter for the topping to create steam pockets that result in flaky biscuits. Don’t skip the resting time after baking – it allows the flavors to meld and the sauce to thicken properly.
For extra richness, substitute half the chicken broth with heavy cream. This creates a more luxurious sauce reminiscent of high-end restaurant versions. If you want to add a Southern Living Chicken Cobbler Recipe twist, incorporate a tablespoon of bourbon into the filling for depth of flavor.
Delicious Variations
Transform this basic recipe into a Chicken Cobbler with Bisquick by replacing the homemade topping with 2 cups of Bisquick mix combined with 2/3 cup milk. This shortcut version saves time while maintaining great taste.
For a Mary Berry Chicken Cobbler inspired variation, add 1/2 cup of frozen mixed vegetables and a splash of white wine to the filling. The wine adds sophistication and complements the herbs beautifully.
Create a Red Lobster Chicken Cobbler style dish by incorporating 1/2 cup of shredded cheddar cheese into the topping and adding a pinch of paprika to the chicken mixture for a subtle smoky flavor.
Storage and Reheating
This casserole stores beautifully in the refrigerator for up to 3 days. Cover tightly with foil and reheat at 350°F for 15-20 minutes until heated through. The dish can also be frozen for up to 3 months – thaw overnight in the refrigerator before reheating.
For meal prep, you can assemble the entire casserole ahead of time and refrigerate for up to 24 hours before baking. Add an extra 5-10 minutes to the baking time if cooking from cold.
Perfect Pairings
Serve this hearty casserole with a crisp green salad dressed with lemon vinaigrette to cut through the richness. Roasted Brussels sprouts or green beans also make excellent sides. For beverages, consider a light white wine like Pinot Grigio or a crisp apple cider.
Nutritional Information
Per Serving (based on 8 servings):
- Calories: 385
- Protein: 28g
- Carbohydrates: 35g
- Fat: 16g
- Fiber: 4g
- Sodium: 890mg
- Sugar: 6g
This Chicken Cobbler Casserole provides a well-balanced meal with lean protein from the chicken, complex carbohydrates from the vegetables and topping, and essential vitamins and minerals from the colorful vegetable medley.
Conclusion
This Easy Chicken Cobbler Recipe proves that comfort food doesn’t have to be complicated to be absolutely delicious. The combination of tender chicken, perfectly seasoned vegetables, and fluffy biscuit topping creates a meal that’s both satisfying and memorable. Whether you’re feeding a hungry family on a weeknight or entertaining guests for a special occasion, this casserole delivers consistent results every time.
The beauty of this recipe lies in its adaptability – you can easily customize it with your favorite vegetables, adjust the seasoning to your taste, or even make it ahead for stress-free entertaining. Once you master this basic technique, you’ll find yourself turning to this reliable recipe again and again.
We’d love to hear about your experience making this Chicken Cobbler Casserole! Please leave a comment below sharing your results, any variations you tried, or questions you might have. Don’t forget to share photos of your creation on social media – there’s nothing quite like seeing how this recipe brings families together around the dinner table.
Frequently Asked Questions
Q: Can I use rotisserie chicken instead of cooking chicken from scratch? A: Absolutely! Using rotisserie chicken is a great time-saver. You’ll need about 3-4 cups of shredded rotisserie chicken. Add it to the vegetables after they’re cooked and proceed with the recipe. This makes it an even easier weeknight option.
Q: What’s the difference between this recipe and a traditional Mary Berry Chicken Cobbler? A: Mary Berry’s version typically includes more herbs like rosemary and sometimes incorporates root vegetables like parsnips. Our American-style version focuses on classic comfort food flavors with a slightly sweeter biscuit topping.
Q: Can I make this recipe in a slow cooker? A: While the stovetop version is recommended for best results, you can adapt it for a slow cooker. Cook the chicken and vegetables on high for 2-3 hours, then add the biscuit topping and cook for another 30-45 minutes until the topping is set.
Q: How do I prevent the biscuit topping from becoming soggy? A: The key is ensuring your filling isn’t too wet before adding the topping. If it seems too liquidy, simmer it uncovered for a few extra minutes to reduce. Also, make sure your oven is fully preheated before baking.
Q: Can I freeze this casserole before baking? A: Yes! Assemble the casserole completely, cover tightly with plastic wrap and foil, and freeze for up to 3 months. Thaw overnight in the refrigerator, then bake as directed, adding 10-15 minutes to the baking time.
Have you tried this recipe? We’d love to see your results! Share your photos and comments below, and don’t forget to tag us on social media. For more delicious comfort food recipes, subscribe to our newsletter and never miss a new post!
Print
Easy Chicken Cobbler Casserole
- Prep Time: 20
- Cook Time: 35
- Total Time: 55
- Yield: 6-8 servings 1x
- Category: Main Dish
- Method: Baking
- Cuisine: American
- Diet: Non-Vegetarian
Description
A warm and bubbling Chicken Cobbler Casserole that combines the heartiness of a chicken pot pie with the charm of a fruit cobbler, perfect for family gatherings.
Ingredients
- 2 pounds boneless, skinless chicken breasts or thighs, cut into 1-inch pieces
- 2 tablespoons olive oil
- 1 medium onion, diced (about 1 cup)
- 2 medium carrots, diced (about 1 cup)
- 2 celery stalks, diced (about 1 cup)
- 3 cloves garlic, minced
- 1/4 cup all-purpose flour
- 2 cups chicken broth
- 1 cup frozen peas
- 1 cup frozen corn kernels
- 1 teaspoon dried thyme
- 1 teaspoon dried sage
- 1/2 teaspoon salt
- 1/4 teaspoon black pepper
- 2 tablespoons fresh parsley, chopped
- 2 cups all-purpose flour (for topping)
- 1 tablespoon baking powder
- 1 teaspoon salt (for topping)
- 1 tablespoon sugar
- 6 tablespoons cold butter, cubed
- 3/4 cup whole milk
- 1/4 cup heavy cream
- 2 tablespoons fresh chives, chopped (optional)
Instructions
- Preheat your oven to 425°F (220°C). Prepare chicken and vegetables.
- Heat olive oil in a large oven-safe skillet. Season and cook chicken for 5-6 minutes until golden brown.
- Add onions, carrots, and celery; sauté for 5 minutes until softened. Stir in garlic and cook for 1 minute.
- Sprinkle flour over the mixture and stir for 1-2 minutes. Gradually add chicken broth while stirring until thickened.
- Stir in peas, corn, herbs, salt, and pepper. Simmer until slightly thickened.
- In a bowl, mix flour, baking powder, salt, and sugar. Cut in cold butter until coarse crumbs form.
- Make a well in the mixture, pour in milk and cream, and stir until just combined.
- Drop the dough in mounds over the filling without covering completely.
- Bake for 20-25 minutes until topping is golden and filling bubbles.
- Let cool for 5 minutes before serving. Garnish with fresh chives if desired.
Notes
Use cold butter for the topping for a flaky biscuit texture. This casserole can be made ahead and refrigerated before baking.
Nutrition
- Serving Size: 1 serving
- Calories: 385
- Sugar: 6g
- Sodium: 890mg
- Fat: 16g
- Saturated Fat: 8g
- Unsaturated Fat: 6g
- Trans Fat: 0g
- Carbohydrates: 35g
- Fiber: 4g
- Protein: 28g
- Cholesterol: 75mg


Comments and Reviews